Wednesday, August 25, 2010

Oh, hai. Remember us?

Oh, hey, how's it going?  It's been a LONG time, but don't worry, we're are getting work done in the blue house on the corner.  Actually, we've gotten a lot done.  Sorta.  But, I can't throw it all out at you at once.

Unfortunately, someone (me) left our camera at our friends house when we went to a party there for the May 24th long weekend.  These friends also happen to live 2+ hours away.  We only just got the camera back near the end of July, so, there's a bit of a gap where our work wasn't quite photo-documented the way I'd like, but, there are some ok iPhone pictures we can share.  I'm going to take a few (2?) posts to bring the world up to date on where we are in the bathroom, and then we'll move on to what we've done in the rest of the house.

When we last spoke we'd finished laying the tile in the bathroom and had it all grouted.  The next step was tiling the shower.

 The first step in the process was mixing up some thinset to apply the Kerdi membrane to the walls and floor.  As I mentioned waaaaaay back in January we used the Schluter Kerdi system for the shower.

Image from schluter.com

The first thing that goes on is the Kerdi Band.  A 5" strip of membrane that helps to seal in all of the corner joints.  That was definitely me work and not Derek work, as it was finicky and required a small amount of patience.


Once all of the corners had been covered in Kerdi Band, it was time to put the membrane up on the walls.  Now, here is where I will fully admit that I made a mistake.  I grabbed the wrong trowel.  So instead of having a nice thin coat of thinset with the small, v-notch trowel that Schluter recommends, I grabbed the big honkin square notch one we used for the floor.  This resulted in a THICK later of thinset that didn't exactly dry smoothly, and really built up the corners.  So, always make sure you grab the right trowel!
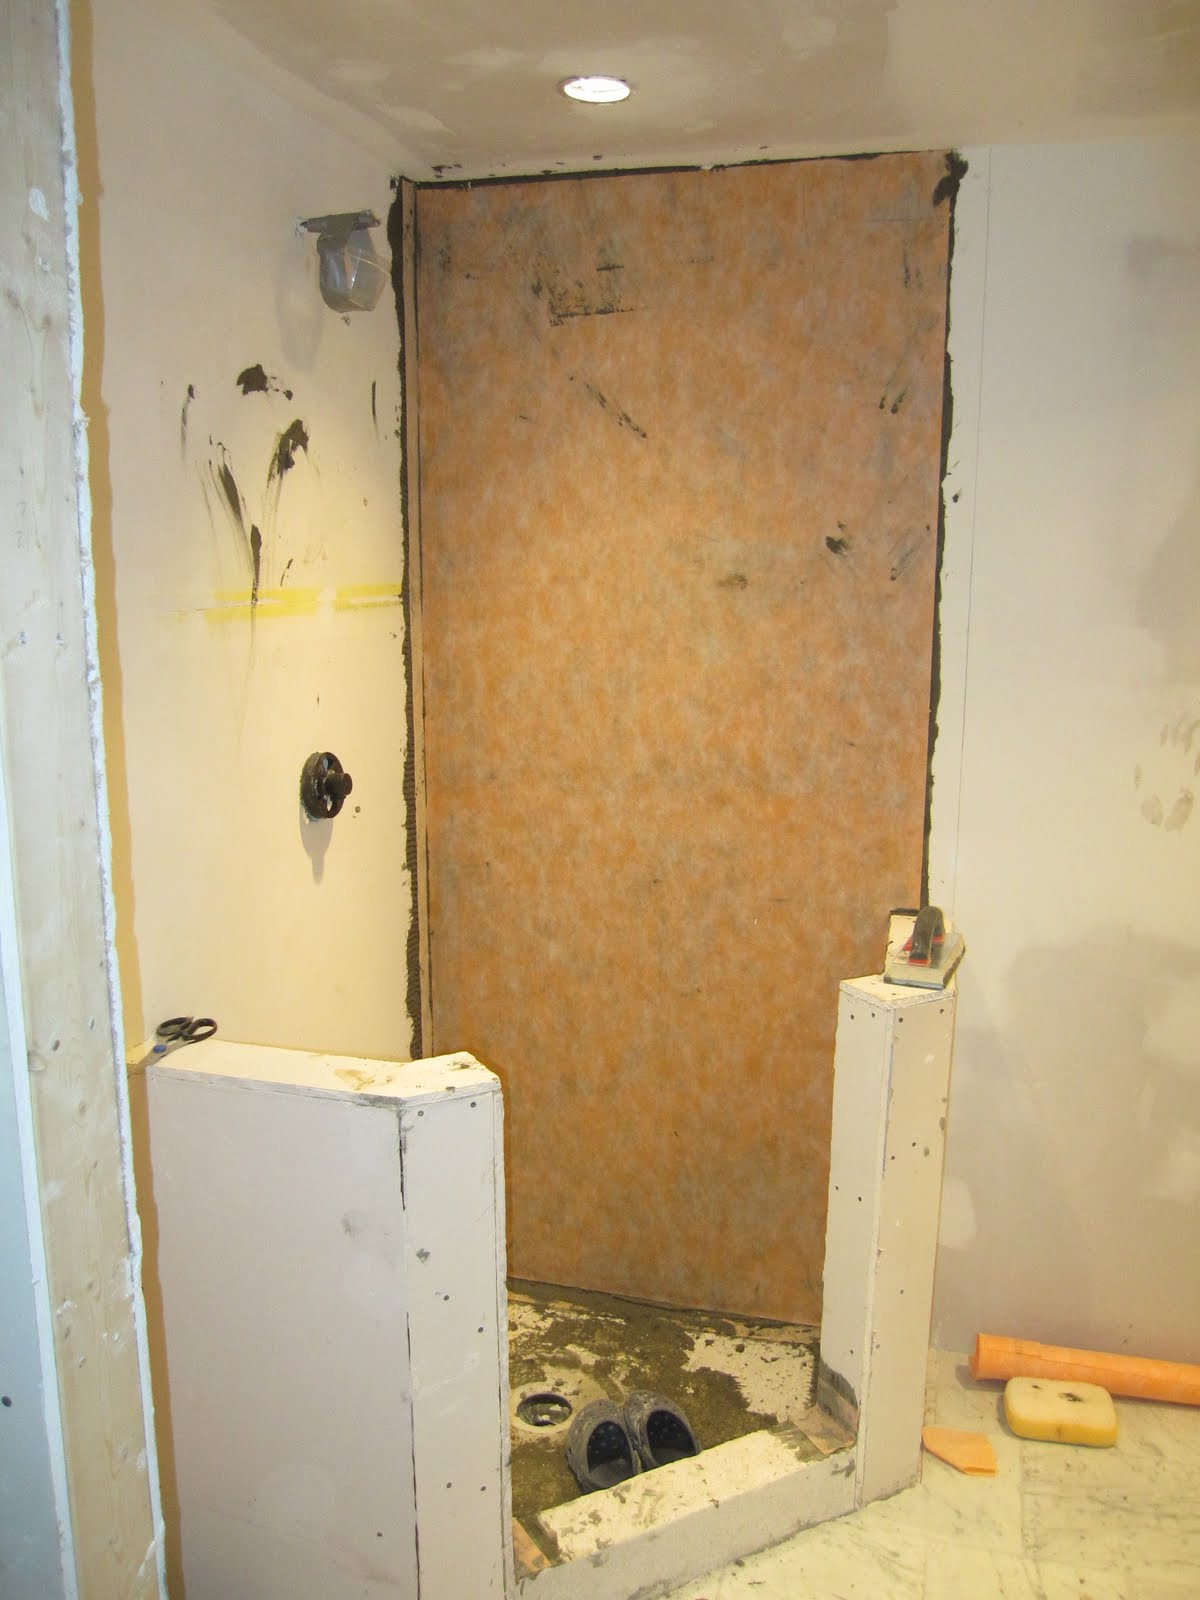

We let the thinset set up for a few days and then got to work on the tile.  The tile we got for the shower walls is a 4"x16" white ceramic tile.  They're huge.  We played around with a few layout options and decided that we really like a running brick pattern with a 1/3 offset.  It makes more sense when you see it.

Derek got started laying the tiles and made it about 3 rows before the number of swear words quickly out numbered all other words.  Tiling, not his forte.  I stepped in and continued on.


See the pattern?  At this point, the camera-forgetting weekend happened, so the only other shower progress picture I have came from my phone.

We sort of played around to see where we wanted our row of mosaic tiles to go, just sort of taking a look as we went to see what we thought looked best.  We settled with just about eye level.


Neither of us can remember for sure how long that took, but I think it was one good, solid day of work.

The next wall had all the freaking holes in it, but, we had our diamond hole saw from doing the floor, so those were easy as pie.  

The best advice I can offer for tiling is to make sure you clean our as much thinset as you can before it dries.  We spent DAYS cleaning the thinset out from the grout lines.  The worst was in the mosaic tile.  So, even if you're tired from tiling, take the time to get the thinset out while it's easy!

The grouting of the shower was pretty easy, although it did take quite a while, and we probably mixed up too much grout at one time, but it got done.  Installing the tile on the shower floor was a fun job.  We ended up getting a special tool from a stained glass shop here in town to cut the glass mosaics on an angle.

Rotary nippers turned out to be the perfect tool for the job.  Home Depot doesn't sell them, so you'll need to find a stained glass shop, but they were only about $20. (or you can borrow ours)

Here's the final thing.  You get a preview of the wall colour in this shot, but hey, that's ok.


I love it.  Here's a closer look at the floor to.  Love that x a million.


Now we just need to get the glass guy in, and the work on this bad boy is done.  We've already installed the shower head, but I'll tell you about that in my next post, where I'll also share the store of the toilet install, and the fiasco that was our pop-up drain.

Wednesday, June 9, 2010

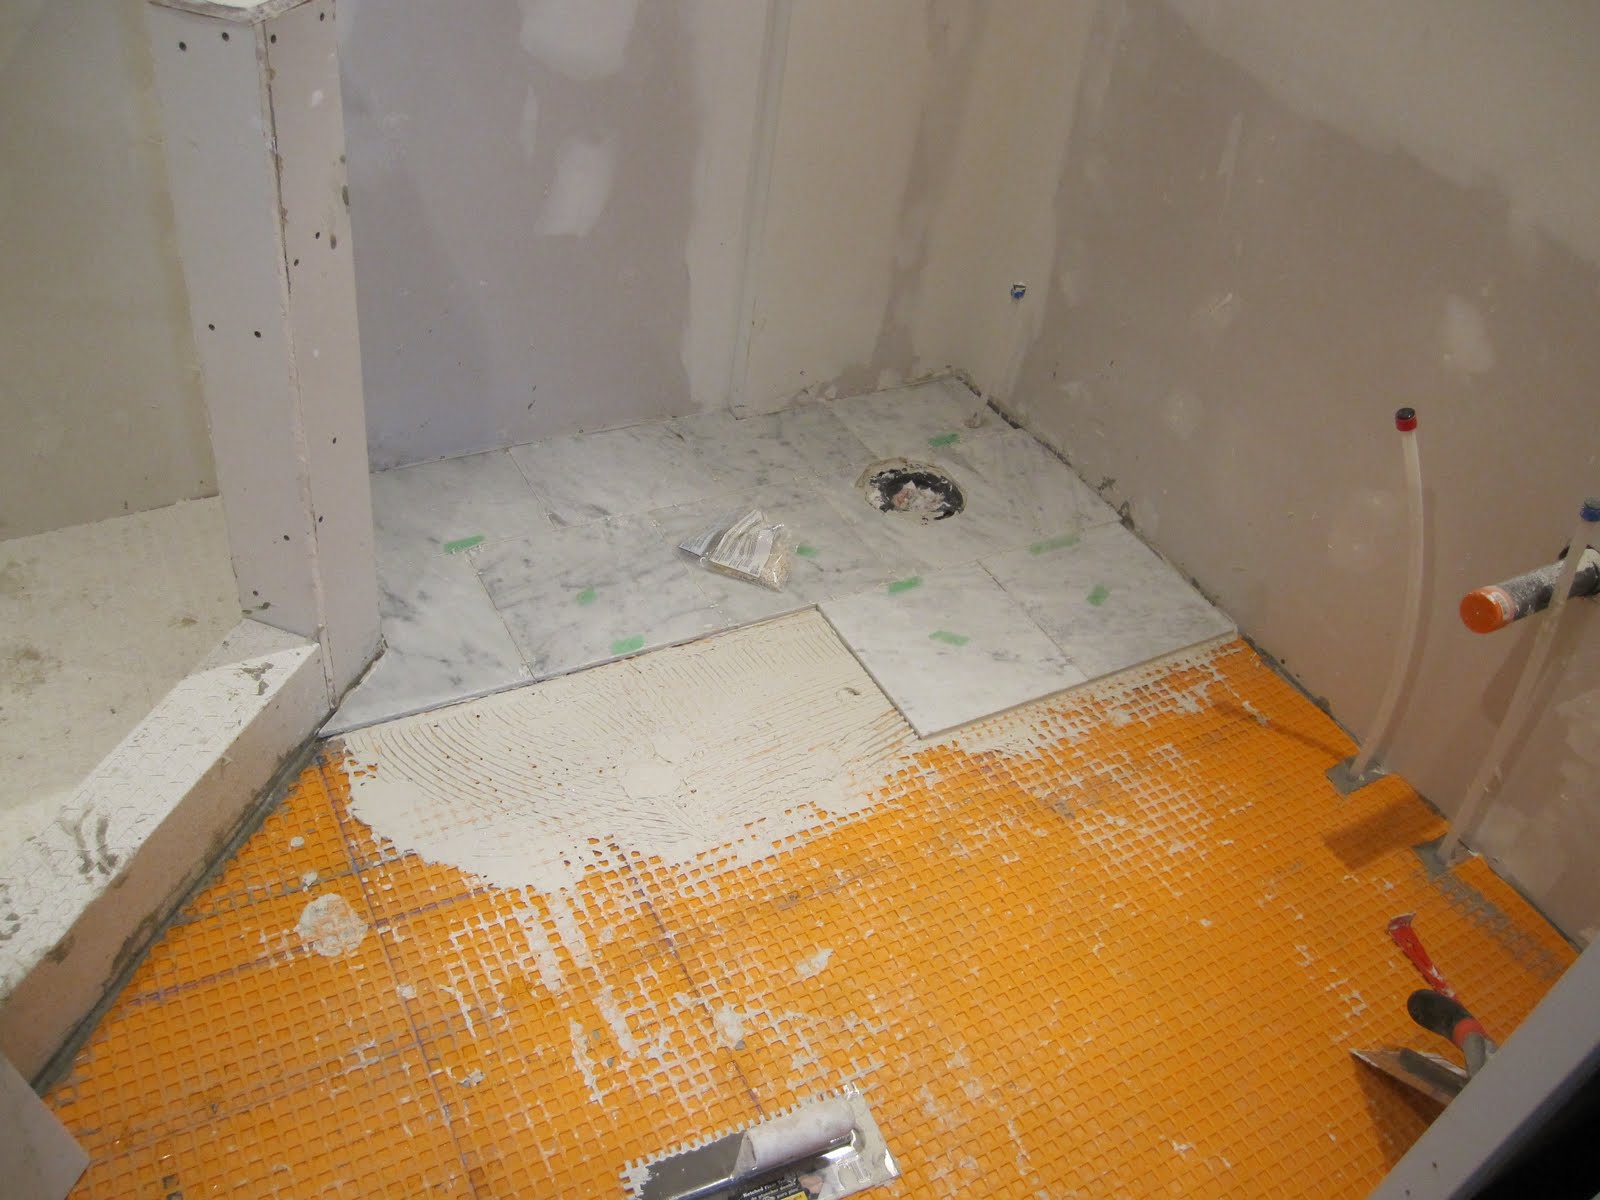
And then there was floor.

I'm a bad, bad blogger.  And a slow renovator!

I cannot wait to have my house put back together.  We'd only lived here a month before things started coming down (and by things, I mean walls), so, after being here for more than 6 months, I'm ready for the dust to be finally settled, for there to be paint on the walls and some sort of flooring other than plywood.

That being said, we're getting very close with the bathroom.  We have to install the tile on the floor of the shower, grout the whole shower, paint the walls and install the fixtures.  I'll touch on the tiling of the shower stall another time, for now I'll tell you the story of the floor!

Neither Derek nor I had any experience with tiling when we decided to take on this project so we turned to the best resource any DIY'er has: Google and message boards.

A question put out on the Decorating & Renovating board on The Nest led to a new obsession great blog with a lot of awesome how-to's, Young House Love.  John and Sherry tackled a bathroom reno that had them installing 12x12 marble tile on the floors and subway tile in the shower.  Huh, that's what we're doing!  Reading through their tiling post a million times, and consulting many other internet resources (including the John Bridge tile forum, which has as much information about tiling as a library has books) we (mostly, sorta) figured out what we needed to to.

Since we planned to install marble tile, and since our floors had a bit more deflection that is generally recommended, we opted to install Ditra on the floor as a substrate over the plywood.

Anyone that watches Holmes on Homes (or any of Mike Holmes' other shows) is probably familiar with Ditra.  He uses it in basically all of his bathroom renos, and well, if it's good enough for Mike, it's good enough for us.

The Ditra goes, as I mentioned, on top of the subfloor and under your tile.  It acts to strengthen the floor by absorbing any movement that may occur.  It also acts as a water resistant membrane.  It could easily be made fully waterproof (with some of the same stuff we used for the shower) but we opted not to take that step.  Just the Ditra alone provides a lot of protection.


Images from Schluter.com

It's also bright orange.

Our first step was to measure and cut out the sections of Ditra that we'd need.


Chloe helped.

After that we laid down a layer of thinset using an appropriately sized v-notch trowel and pressed the pieces of Ditra down, smoothing it out using a grout float.


We let that set for a day or two and then began planning the layout of the floor tiles.

The way we saw it, we had two options for lay out.  We called them even and offset.

Even

Offset

The magic of the internet allowed us to nearly instantly poll a large group of people to find out what they thought worked best.

The results were unanimous for offset, which is good, because that's what we liked best too.  It's also really great for hiding less than perfect work, which is ideal for first time tilers.

So, we laid out some guide lines (that we never ended up using because they were quickly covered in thinset) and got to work.


Bonus tip: To keep chalk lines from quickly being erased by your feet and tools, cover them over with regular aerosol hairspray!

Here's me at the beginning of the day:


We quickly worked out a great system.  Derek would cut any pieces that had to be cut (on the wet saw set up in the basement) while I laid the tile.  For large runs of full tile, Derek would work ahead of me and trowel out the thinset on the ground while I set and squared the tiles.


As you can see above, we opted to use white thinset for the marble instead of standard grey.  As a natural stone marble is much more porous than ceramic, so it's possible that the colour of the thinset could be seen to seep through the tile.  Going with white thinset eliminates the possibility of any unsightly splotches.

We kept working away in this fashion alllll day long.  As some point we realized we were kinda hungry and scarfed down some grilled cheese and then quickly got back to work.


In order to ensure a good bond, we chose to not only trowel out thinset on the floor, but also back-butter each tile. 

Nearly 9 hours later we were finally down to the last tile (or so we thought)


We got that last tile in place and stepped back to admire our awesomeness.

Then we realized that the two tiles right in the centre of the door were way too light.  Such is the nature of natural stone, not every one is exactly the same, so we asked ourselves if we wanted to pull them up and replace them with others (thankfully we had lots of extras).

Exhausted Andrea and Derek thought that we could live with the colour variation, but we knew that Future Andrea and Derek just wouldn't be satisfied with a less than perfect job when we had the opportunity to correct it, so, up the tiles came, and down new ones went.

We got cleaned up and then promptly drove to Wild Wing and consumed more wings than a normal human should be allowed to.

We gave the floor a good day or so (ok, it was a week) before we tackled the grout.  We opted to go with a light grey that matched well with the veining in the tile.

Apparently I forgot to photo-document the grouting process, but it was fairly straightforward and didn't take a ton of time.  I can say though, Meka definitely approves of our tiling job!


That's all for now.  Once I get my camera back (I we may have forgotten it at a friends house 2.5 hours away at a party a few weekends ago)  I'll share the shower tiling process (which has been slow, but steady) and then we should be up to date!

Sunday, April 11, 2010

Please excuse this break from our regularly scheduled program...

... but what went down in the blue house on the corner this weekend is just too big to hold back until the bathroom is done.

Friday night of this weekend Derek's family came down to celebrate his birthday (the mister turns a year older on Monday!) and help us plan out how to best approach the renovations of our main floor.

First thing Saturday morning (after we downed 5 pots of coffee, no joke) the boys started taking down the drywall/plaster board (I give that a slashy because the previous owners put drywall on top of the old plaster board) in order to get a look at the bones of the main floor.

Derek's Dad starting to plan out where to cut.

Half the wall down.

Plaster down!

The boys continued taking down the outside of the walls as the morning when on.


At that point Derek's dad starting talking about what we should do, using words like double jack studs, king studs, double headers and more.  What really caught my attention was the part that went something like "If you guys go get the material now, we can have this done today".

One trip to Home Depot, a pack of bungee cords and a red pillow case later, we had a load of lumber at the house.


We did learn that, with a bit of comfort sacrifice on my part, that we can fit two 2'x8'x10"s, four 2'x4'x10"s and twelve 2'x4'x92 5/8's in the back of a Dodge Calibur.

The guys kicked the ladies out of the house (I took a nap in said Dodge Calibur) so that they could do the "stressful part" (in their defense, replacing a load bearing wall with a couple of 2x8's and some 2x4's definitely qualifies as stressful in my book) and about 30 minutes later I was called back in the house to take a look.

Bam, wall gone.

Next they moved their focus to the living room wall.  In fairly short order (ie, the time it took me to have a shower and get ready) they had that wall opened up and reinforced.


We cleaned up a bit and then headed over to my parents house to have a nice birthday dinner for the husband.

Sunday morning the work started up again.  Unfortunately the dust that a renovation causes did not agree with my lungs, so I spent the morning at a walk-in clinic getting a prescription for an inhaler while the guys took down the last wall.  Sadly, that means no pictures of the doing.  Instead, I'll present some before and after pictures using the pictures we took the day we took possession.  You'll notice things are a biiiit different.


Yeah, it's a bit different.  Basically now the main floor living area is all open.  There's a small "T" shaped wall left in the middle of things to carry the load, but things flow so nicely now. 


And if you're wondering where we put all the plaster and such that we've torn down, well, it's in the basement.


Yeah.  Next weekend we're renting a bin.

And with that, we'll now return to our regularly scheduled programming.  Next time, bathroom tile, I promise!

Wednesday, April 7, 2010

*tap tap tap* Is this thing on?

Sooo, it's only been 2 months since we last saw each other, and as much as I'd like to say that the bathroom is totally finished and in perfect working order, that's not quite the case.

The month of February saw Derek working looooong hours and us not having a lot of motivation to get things done afterwards.   Since then we have gotten a lot done, but what fun would it be to tell you about it all in one post?

So, for today, you get lights and drywall!

As I mentioned before our good friend Jesse came by to help us with the wiring in the bathroom.  Once we got the drywall up on the ceiling, we were able to put in the potlights (with the valuable help of our good friend Tim, that is).


Tim also helped us by running the wiring for a row of potlights down the hallway from the kitchen towards the bathroom, and a row in the soon to be library.


Ooooo, lights!  (and yes, we use a snow shovel to scoop up construction destruction debris.

Along with lights came drywall.  Which I must say, really helped to bring the room together.


After putting up the drywall came mudding.

First coat:

Second coat:

Finish coat:


Yeah, ok, you got me.   That was the same picture 3 times.  But that's about as exciting as mudding gets.

Next time (which will be way less than 2 months from now) I'll share the details of our fancy new marble floor.

Sunday, February 7, 2010

Splish Splash

After staying up into the wee hours of the morning to get the shower pan installed, our plumber arrived bright and early. 

Derek was quite nice and let me stay in bed for a few hours while he was up after a mere 4 hours of sleep to oversee the plumbing job.

I have to say though, those extra 2 hours of sleep I was allowed were not the most restful, as all I could hear was the sounds of a drywall saw cutting up walls.  When I finally emerged from our room, this is what I saw in one of our guest rooms.


Holes in the wall, wood chips and insulation everywhere!  In order to properly vent the new drain lines in the bathroom, the plumber had to go up through the back wall of the bathroom and drill through the top plate of that wall, then up through the bedroom wall, through that top plate, and connect in with the current vent line in the attic.

 
That`s the attic.  Fun yellow insulation.

When he was here the first time, the plumber made our main vent stack a thing of beauty.  45° Y`s, and a whole lot more connections, but everything is now at or above code, which is how we roll.  Wanna see the new stack?  Of course you do!


Derek giggled all the first night about something the plumber said when he was first taking apart the stack.  "Oh, look, there's some debris".  Derek's called poop "debris" since then.
Here's a bit of the mess of fittings that were part of the process.

 
Yes, we use a snow shovel to pick up construction destruction garbage.

So what did all this mess get us?  New plumbing for a sink, a toilet drain that's now a reasonable distance from the back wall, and plumbing for a brand spanking new shower!

 
Sink plumbing! (with new vent)

 
Shower plumbing!
Our main decision now is whether or not we want to keep the plumbing in for the "toe tester".  Basically, the drain near that bottom.  You can use it to test the water temperature with your toe (hence the name) and then use it to drain the water out of the line when you turn the shower off.  As of right now, we think that due to the limited size of the shower, we might keep it out, but the plumber advises to keep it in.  

What do you guys think?  Does your shower stall have a toe tester?  Should we keep it, or ditch it?

Next time, lights!