Saturday, February 26, 2011

Floor!

Well, the hardwood is pretty well done on the main floor.  And oh em gee it is so nice.  After living with plywood floors for over a year, any floor would have been welcome, really, but this stuff is just quite superb.

With the help of the very talented Eva Kovalcik of Atlanta, GA we now have a plan for the new kitchen.  Looking at that plan (which I'll share on another day) and the layout of the rest of the house we decided where we wanted to lay tile for the kitchen.  Once we had that figured out, Derek got right to work laying down the rest of the hardwood.


It took us around a day and a half to finish up and man we're a good team.

When you're using the random length boards there are a few "rules" to keep in mind.  Between one row and the two behind it you don't want any joints within 6" of each other, and you want to keep a good mix of long and short boards.  So, picking out the right size boards is sort of like a puzzle, and I'm never one to shy away from a puzzle.  I may have exclaimed a time or two (after laying out a perfectly spaced row that created very little waste) "I'm good at this game".  I would get the next row or so of boards ready while Derek came behind me with the stapler.  Working together we were able to just fly.

Here's what it looks like now.


Derek still has a bit of work to do on the stair nosing going towards the back door, and the baseboard still needs to go down, but we're starting to get there.

Now, to get going on the kitchen!

Monday, January 17, 2011

Finishing Touches

As promised, I'm going to share the (mostly) finishing touches on the back room.  I apologize in advance for the crappy iPhone pictures.  I, yet again, left our camera at a friends place.  Whoops.

First up, the fire place.  This is more kinda than mostly finished, but still, it's very important.

When we first moved in the house had an old stove style gas fireplace.


Gross, right?

Using one of our connections we were able to get a brand spanking new Lennox gas fireplace for only $700.  Comparable fireplaces in stores around us were easily $1500, so we got a really, really good deal.

We wanted to keep the fireplace in the corner to maximize function in the room, so, following the instructions, and using our big ol' brains, Derek got the framing done and set the fireplace in it's new home.


Isn't that better?  The only change that's been made since then was the addition of our Christmas stockings and some lights.  We'll be calling up Bill the Gas Guy soon to help us hook this guy back up.

Next up was paint.  Like our previous paint choices we wanted something that went well with all the other colours in the house.  Since you can see all the other colours on the main floor from the back room, it was important to us that it flowed.

We knew we wanted to go with a grey, so I picked up about a million different swatches and we started eliminating.  In the end we settled on Ashes from the Behr Premium Plus Ultra line.


I don't have any in-process painting pictures, so we'll move right along to floor!

We shopped around a bit for our flooring, going back and forth between dark flooring and medium flooring and back again.  In the end we settled for red oak flooring in a stain called Cappuccino.  It was actually a last minute decision.  We'd brought home a sample of red oak in the stain Walnut and were set on ordering it, but decided to take a look before we finalized the order at the next lighter stain colour.  I'm really glad we did too, because the floor we ended up with is just perfect.

Since there was still a good bit of work to do in the front half of the house, Derek started the flooring install just before the bathroom.


We worked together and the floor went down pretty quickly.  One of us would pick out the next row or so of boards while the other nailed them down.  We switched off a few times and in one night we got the hallway by the bathroom and about 2/3 of the back room done.  


We then finished that up the next day.  By then, it was Christmas!

Over the break between Christmas and New Years I spent a about 2 days putting a second coat of paint on the walls and caulking and filling all the holes/joints on the trim, and then priming and painting the trim out with a nice, bright, shiny white.

A set of brown-ish curtains from Home Depot later and we were ready to move the couch and TV into the room!


So, that's where we're at now!  We're officially moved into the back room as our living room, and the old living room is now the pre-kitchen.  It took Derek approximately 37 minutes to start tearing the walls down once we had the couch moved out.

Right now we're in planning mode for the kitchen, which will be the next big thing on the list.  Once we at least get a plan drawn up for the kitchen we can start moving along with laying the rest of the floor.

Saturday, January 15, 2011

Up goes the ceiling!

I thought I'd break this up into a few different posts, but, well, we might as well just get this over with, right??

The last time I updated this thing (I promise to try and do that more often now!) we'd removed the hump between the house and the back room and put up all of the insulation.  The next step from there was to get the vapour barrier up.

Since we were planning on reusing the potlights that were already in the room, we picked up some plastic "buckets" to put around them.  Up they went along with some ventilation panels to put up at the roof.


From there we added Roxul insulation above the plastic and between the beams in the ceiling.


Then up went the poly for vapour barrier.


By this point you could really feel a difference in this room.  This was around the end of October and it was starting to get a bit chilly outside.

We had decided that we would not turn on the furnace until we at least got the vapour barrier up in the back room, so this was a big day for me.  That is, until I went to turn on the furnace.

Yup, nothing.  The thermostat was all lit up, the furnace was turned on, but it would not fire up.  Crap.

So, we spent another week in the cold, and had a call in to Colin's friend Bill, who just happens to be a gas guy.  I decided to double check absolutely everything before Bill came over.  I pulled the face off of the thermostat and lo' be behold, the pins that connect the face to the actual wires that run to the furnace were bent.  Apparently we hadn't actually used the furnace since we did wall tear down and thermostat relocation back in April.  So, crisis averted, heat back on, no gas guy required.  Yay!

When we'd pulled down the ceiling in this room we were rather perplexed by why they'd put up 2 layers of drywall with some strapping in between.  Well, as the first sheets of drywall went up with Tim's help, it became glaringly obvious.


What?  You can't see the problem?  Here, let me try and help.  The green line below is straight.  The blue line traces the contours of the ceiling.


Ok, so it's still hard to see, but, longs story short, a ceiling should not have "contours".

So, off to Home Depot the boys went, and up went a dropped ceiling.  The guys decided it would be a lot easier to drop the ceiling than to attempt to level up each joist individually.


The guys finished up the carpentry and got the drywall up on the ceiling.  I think they might have finally called it a night around 3 am?

Bright and early the next day we were up and having breakfast.  Tim had to be on the road by 10am and we wanted to make use of his truck to take advantage of a buy-2-get-1 sale on trim at Rona.


That's what $1000 worth of trim looks like.  Not that much, eh?

I guess I'll leave it there for now, but I promise to show you the (mostly) finished back room soon.

Monday, November 15, 2010

Hump no more

Can I just say how nice it is to have a flat floor?

Yes, most people probably think that flat floors are pretty well par for the course and, well, standard, but not in the blue house on the corner.

You see, when the previous/original owners added in the family room addition, they didn't seem overly concerned about the fact that the floors of the addition and the main house didn't match up.

(do you like my update floor plan?  it's approximate)

It's not even that the floors don't match up.  That wouldn't have been as much of an issue.  The issue was more so that there was a GIANT hump between the two rooms.  There was quite literally a ramp that led up to the doorway to the family room and then a ramp that led back down again on the other side.

You can sort of see it here, in the picture that also shows the many many layers of flooring we had to deal with in the den:


The garbage bag is sitting at the very top of the hump, and where you can see the plywood, well,, that's the down slope.

So, Derek did what Derek does best and I came home one day to find that this:


now looked like this:


which quickly became this:

 
Yes, that's dirt.  In my house.


I wish I has pictures that illustrated just how unlevel the floor was.  At the door between the addition and the main part of the house the floor was 3 1/4" higher than the floor in the main house and at least 1 1/2" higher than the floor in the addition itself.

Also, there was next to no insulation in the walls of the addition, nor was there much in the ceiling or the floor.  And don't even get my started on the vapour, or lack there of, barrier.

With lots of help from the cats Derek got the floor/ground tidied up, pulled out all of the errant nails and generally just got the space ready to put back together.


One of my good work friends, Colin, came over to help Derek work out his plan of attack for leveling the floor.  The plan involved lots of lumber, brackets, and some fun power tools.

Derek used the reciprocating saw and his fancy new hand planer to bring the floor as close to level as possible.  At the very least, it's flat.  He beefed up the structure, added in hangers and put blocking in allllll over the place.


One very very big trip to Home Depot later saw us outfitted with most of the supplies we'd need to finish off the room.  It also meant we lost use of our lovely bathroom for a few days.  We got very lucky, as the timing of a sale on Roxul (the green batt insulation) and drywall just happened to coincide perfectly with this stage of the project.  We ended up having to rent the van from Home Depot to get our haul home.  And, honestly, I'm surprised we'd never rented the van before.  $20 + gas for 90 minutes and we brought a LOT home.  See?

 Chloe sat on top of the pile of insulation for as long as it was there.  She loved it!
Also, the pile of junk in the front?  That's my dining room table.  Oh joy.


We used strips of Tyvek stapled to the underside of the floor joist to hold up the insulation in order to put the vapour barrier on the warm side, unlike before.  The cats were so used to playing down in the dirt that they had to see if they could walk along the newly insulated floor.


Luckily, no one fell through.

After that, Derek screwed down the new plywood and we no longer have a hump!


You can also see my handy dandy insulation job here.  Now, normally I loathe insulating.  I hate how the bits just get everywhere, but this time I was motivated to grow a pair and do it.  You see, at this point we were nearly the end of October, and it was starting to get mighty chilly.  We outright refused to turn on the furnace until that back room at least had insulation and vapour barrier on the walls, so, I sealed myself into a somewhat impermeable jacket and went to work.

This job was a lot of work.  And unfortunately, it was a lot of work that I couldn't really help with.  We will never know why the previous homeowners thought that the job their contractors did on this addition was acceptable, but I guess it doesn't matter now, it's gone!
Next time I'll share the oh-so-lovely story of the ceiling, including how we found out why they had 2 layers of drywall on the ceiling with strapping in between!  Spoiler alert: it's not because the ceiling was flat.

Thursday, October 7, 2010

Paint!

Nope, the bathroom isn't totally finished yet, but thanks for asking!  Actually, the giant pile of drywall and plywood is preventing us from even using the bathroom right now, but that's a story for another post.

Once we mostly finished up the bathroom we moved on to the rest of the main floor that was ripped up.

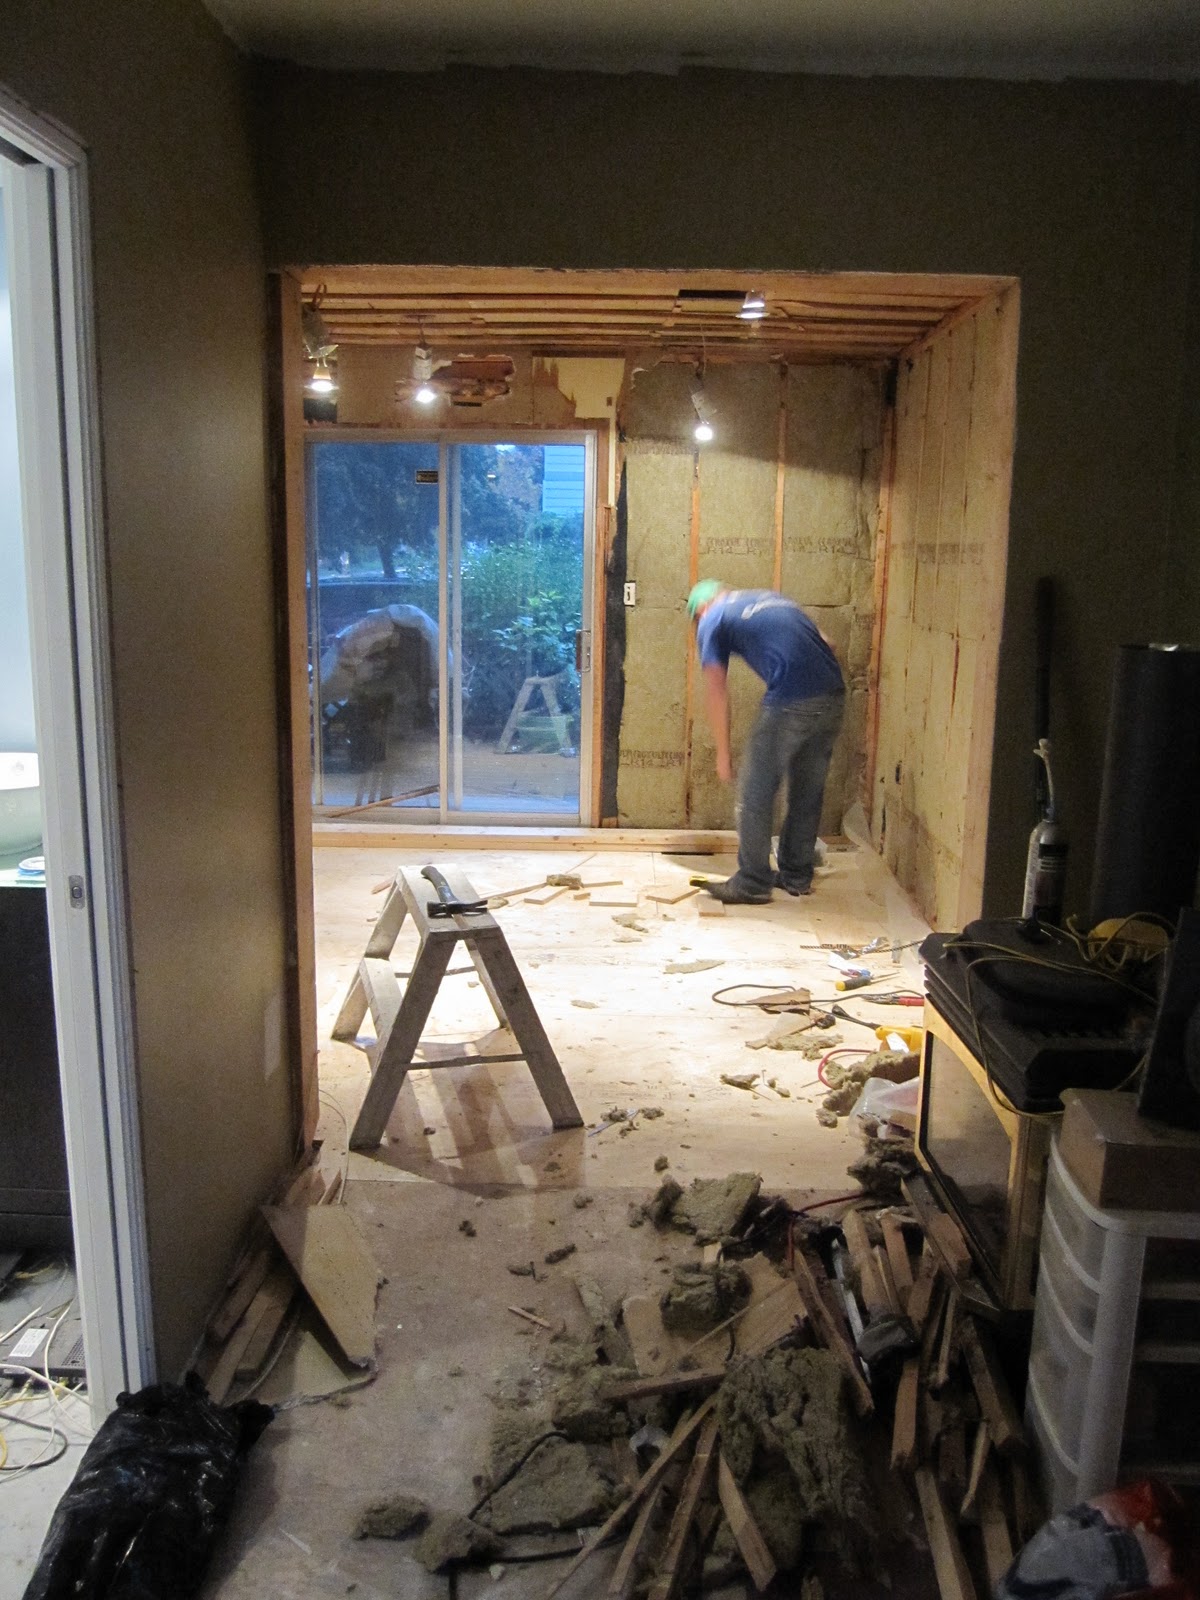
Just after we removed the wall separating the dining room and the soon-to-be-library, it looked like this:

April 11, 2010

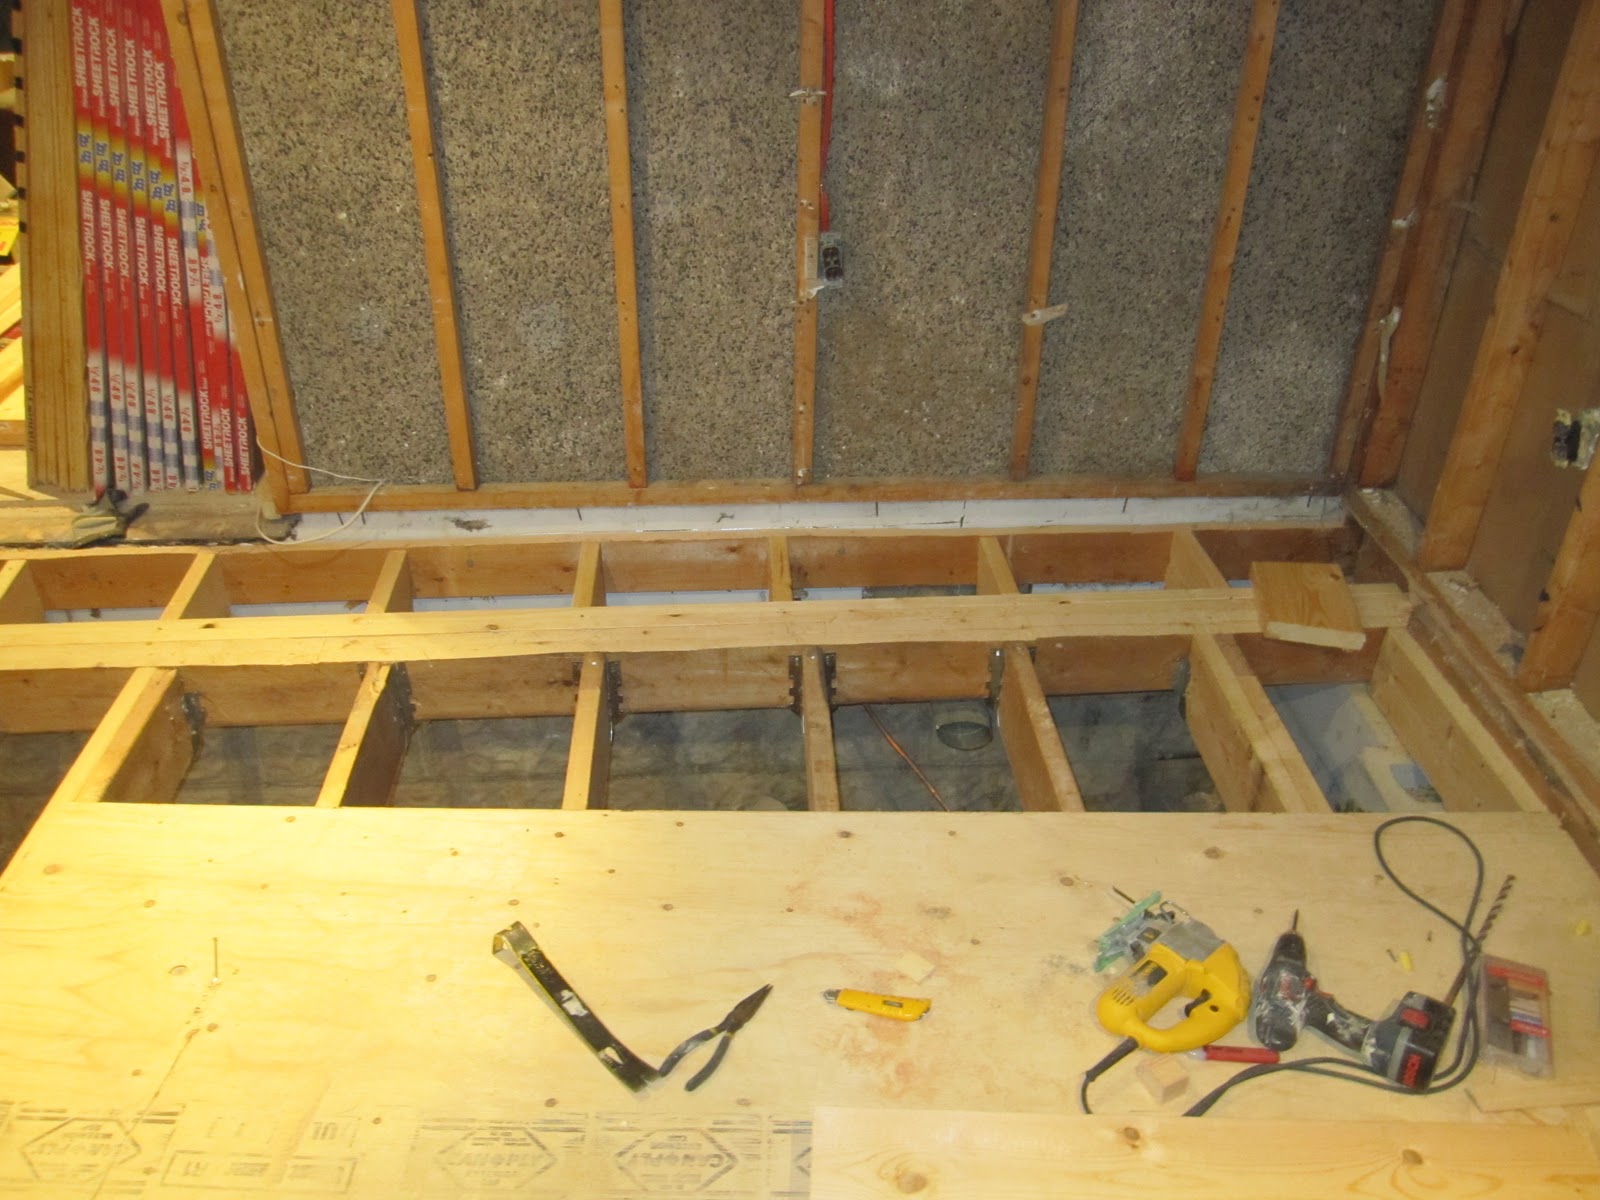
Shortly after that, the old plaster came down and it looked a little like this:

April 23, 2010

All of that useless vapour "barrier" (aka wax paper) and pitiful 1940's excuse for insulation came down, Roxul and good, proper plastic vapour barrier went up and then we got to drywalling.  After that, it looked a little something like this:

July 25, 2010 
(yeah, it took a while, so what?!)

Then, it was time to pick out paint colours!  Oh joy.  When looking around at some dining room pictures, and watching LOTS of HGTV and DIY networks, I fell in love with the look of wainscotting.  I looked up many different blog posts on the topic if diy'ing it, and decided that it was definitely something the Derek and I could handle.

One of my main inspirations was the dining room from the show Home to Flip.

Image from cherishtoronto,blogspot.com

I love everything about this room.  I love the wall colour, and the print on the wall, the wainscotting, the crown moulding, everything.  I knew I wanted to go with a teal for the walls, so we started out with a few paint chips that we thought could work.

Since we're planning on making a built-in bookshelf/desk in the space we're calling the library, we thought we'd paint the wall that will the be back of the bookcase in a fun colour.  With the teal we'd already imagined, and the blue of the bathroom, a nice grassy/mossy green was our first thought.  Into our hands when a slew of possible paint chips.

Next, we decided that we'd like a nice sand/wheat/beige-but-better colour to run through the common areas of the house.  This colour is basically going to run along the main floor hallway, up the stairs and onto the second floor.  It was important that we picked a colour that would work well with the teal and the green that we choose.

So, we did what any smart DIYer would do, and taped the paint chips we liked up to the wall.  At first, there were many, however, it was quite easy to throw away some, as they were just too pink.  Having lived in peach for the last 10 months we wanted to steer far far away from anything that even hinted at peach or pink.


We left the chips up for a few days and looked at them in different types of light.  Occasionally one of us would tear down one that just wasn't right and move some things around.  We ended up pulling these three colours together:


On the left is Woven Stray from the Behr Premium Plus Ultra line, on the right is Dragon Fly, also of the Premium Plus Ultra line and in the centre is Grape Leaves, from just the regular Premium Plus line.

At first we were hesitant to buy the "fancy pants paint" that is the Premium Plus Ultra, but after asking around (thank you August '09 ladies) the verdict was that it really was worth the extra money.  And man, do I agree.

First up we painted the library.  It took two coats to get a good, even covering.  And yes, we primed first, don't worry!

Oooo, pretty.

Then, like any good nerd DIYer we busted out our (new) laser level and marked out the boundaries of the dining room paint.


Then, we set to painting.  In our house we usually paint as a team.  I cut in at the corners and, in places where there won't be crown moulding, at the ceiling while Derek goes through and rolls out the rest of the wall.  Generally, we finish up at about the same time.

After having to do 2 coats of the green to get good covering, moving to the Premium Plus Ultra paint was a significant difference.  As long as you take your time, you can easily get great coverage with one coat.  There were a few spots that needed a second pass with the roller, but you're totally fine to touch those spots up while the paint is still wet.


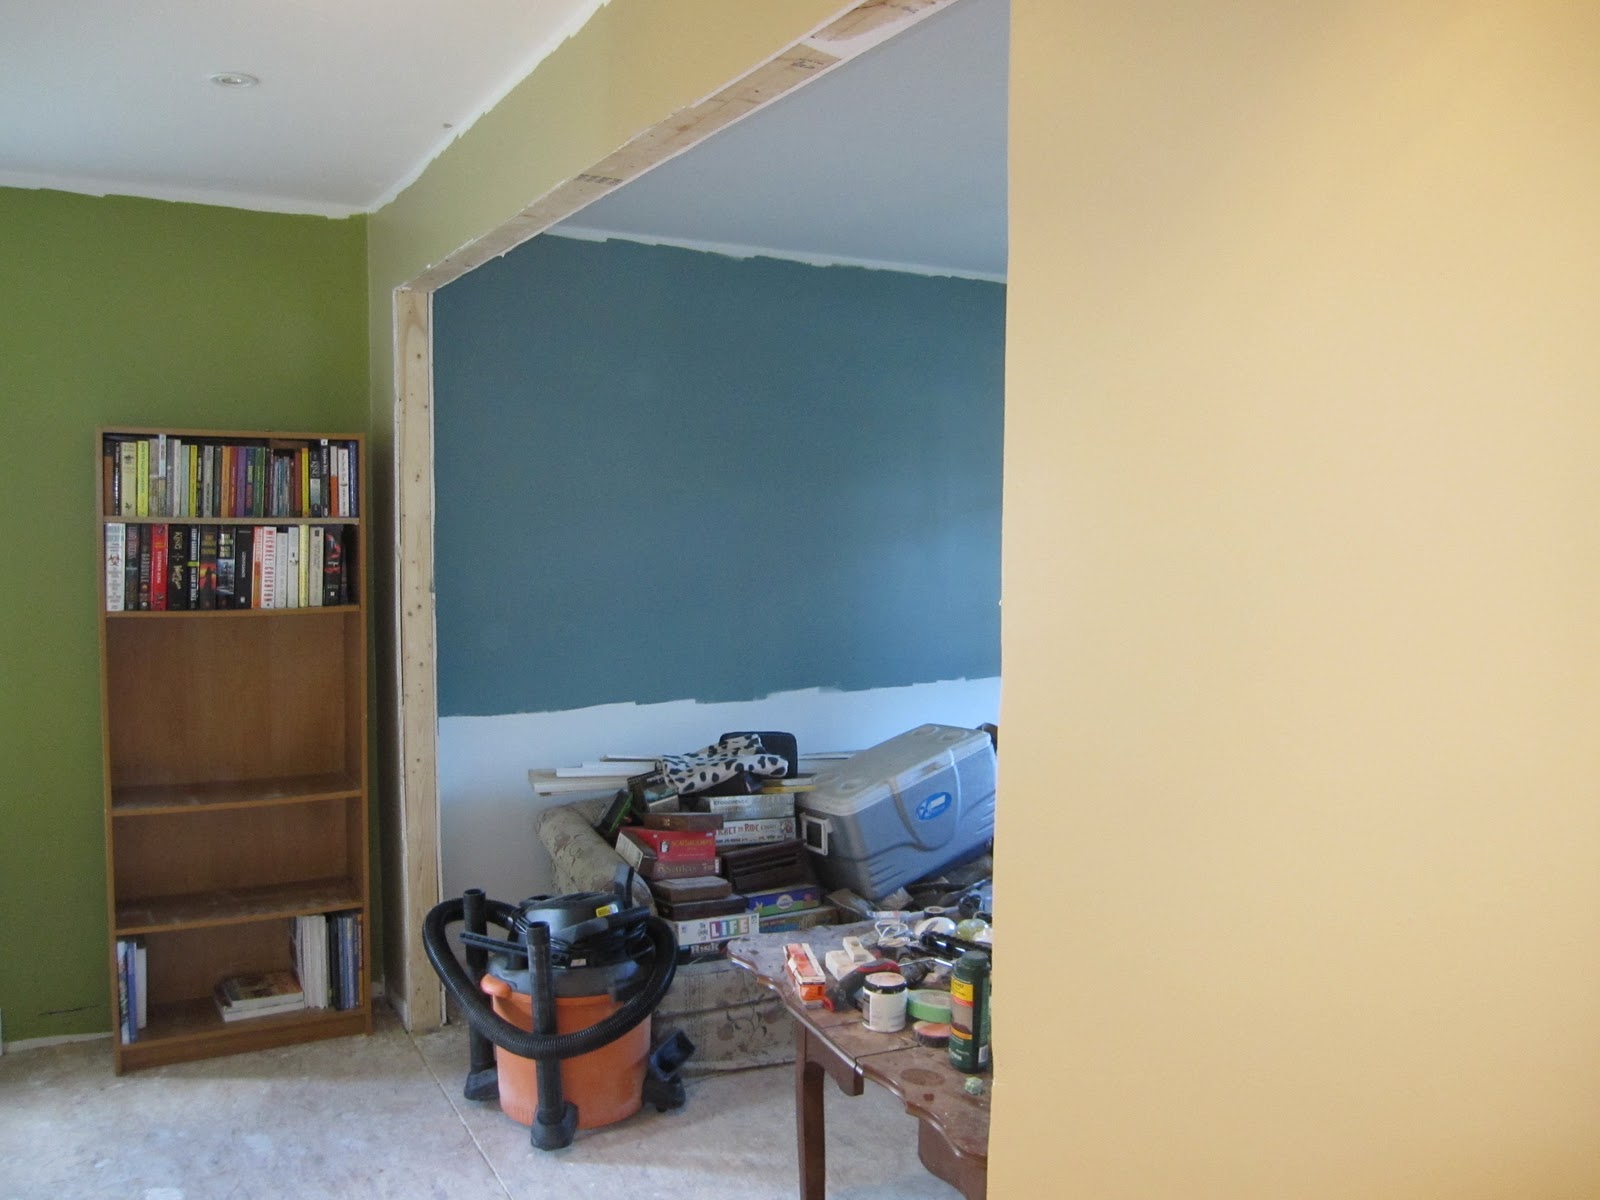
We've still got a little bit of mud work to do in the hallway (where we had to cut open the wall because we thought the shower valve was set too far forward) so we've only gotten a little bit of the Woven Straw colour on the wall, but here you can see all three new colours together. 


Also, you can see that even though the dining room isn't done, there's a whole pile of stuff in there now.  Where did that come from you ask?  Well, the back room of course!  But that's definitely a story for another post.

To complete the series of pictures you saw at the beginning of this post, here's what the space looks like now:

September 5, 2010

That's it for now.  Next time I'll tell you the story of the uneven addition and the hump in the floor that is no more!

Friday, September 3, 2010

Things that move water.

Look at me.  I'm such a good blogger this week.

Now that we had the vanity in place, we moved on to installing the toilet.  The day we decided to do this was so grossly hot outside that things didn't exactly go as planned.

The first step in installing a toilet is to install the flange bolts.


Well, one of our flange bolts took a very unfortunate drop down the toilet drain.  We'd only just taken the rag we had blocking the drain out, so sadly, the bolt was lost.

Off Derek went to Canadian Tire.  That was trip number 1.

For some reason, when the plumber was here and installed the new plumbing for the toilet, it was installed a bit too close to the ground.  Once we got the tile on the floor, the closet flange was below the level of the floor.

That's a closet flange.  Not ours.  Thanks about.com

Thankfully, while we were browsing for toilets our favourite store ever (Home Depot of course) I made note of these fancy things called, ideally enough, closet flange extenders.


Basically, it's a ring of plastic that's the same shape as the top of the closet flange that's attached to your plumbing.  It has a gasket material on the bottom that seals to your existing flange, and holes to screw it into your floor.  Using these little pieces of awesome we were able to bring the level of the flange up to the proper level.

Getting those rings from Home Depot was trip number 2.

The flange extenders come 2 in a pack.  After we put the first one down, we tired to install the toilet.  Unfortunately, due to both the extreme nasty heat severely softening the wax, and the fact that just one flange extender didn't quite bring the level up high enough, the wax ring just didn't make the seal we were looking for.  We didn't pour any water down the drain, but our experience from installing a toilet in our other bathroom, we know what "feel" we were aiming for.

Another trip to Canadian Tire for a second wax ring was trip number 3.

With the second extender in place and the new wax ring in hand, we got the toilet installed in no time.  Yes, it might have taken a total of 5 hours from the start to the finish, but we got it done.


The next thing we tackled was installing the shower head.

The decision to take the toe tester out of the shower stall lead to a slow, constant drip from the shower head pipe sticking out of the wall.  The original shower head we bought was a normal, stick out of the wall and bends down type, and would have continued to drip.

So, applying our knowledge of hydrostatic pressure and general fluid dynamics we started looking for a shower head that came on an arm of a different shape.  Thankfully, Pfister had one that fit the bill perfectly.  A quick special order from that place we go to all the time and some teflon tape later, we had a functioning shower head!


The fact that the shower head arm goes up above the level of where the pipe comes out of the wall is what keeps it from dripping.  And bonus, we got a rain shower head!

Next step, installing the sink and faucet.

We had some issues with the drain for the sink.  When we ordered the sink, drain and faucet back at the end of January, the lovely lady at Home Depot suggested we get the pop-up drain, since it's a bathroom, and, well, having the ability to plug the sink is a good thing.

When the drain finally came it we just put it in the back room with everything else.

A few weeks ago (so, like, 7 months after we'd ordered the drain) we went to put everything together, and well, the drain would not work.  Because we got an overflow sink we needed a drain with a longer drain pipe in order to accommodate the extra height of the sink.  Well, this one just wouldn't do.

So, we took it back to Home Depot and went to see the nice lady in the kitchen and bath department.  I was inadvertently bitchy to her, and I felt bad.  Turns out, the company sent the wrong part.  Our lovely Home Depot associate had done everything exactly correctly.  She took down our info and had the correct drain to us in a matter of days.

We finally got to sink install time.  A butt load of teflon tape and silicon caulking, and some McGyver style improvising later, we have this!


I'm not 100% sold on the towel holder thingy yet, but attaching one to the wall might be tough.  The pocket door is immediately to the right of the sink, so it could go there, but it might be tricky to install securely.

That's about it.  All we have to do now is a few paint touch ups, clean up some silicone from various spots and get the glass guy in.  Oh, and hang the mirror.  Right now we're focusing on getting the dining room finished.  Just last night we painted, but there's still a lot to be done.